- Understanding VICIdial Transfer Types
- How VICIdial Call Transfer Configuration Works at the System Level
- Configuring Blind Transfer in VICIdial
- Configuring Attended (Warm) Transfer in VICIdial
- Setting Up Agent Call Routing and Transfer Groups
- Campaign-Level Transfer Permissions and User Group Control
- Accessing and Verifying Configuration via the Admin Panel
- Common Transfer Configuration Errors and Resolutions
- Frequently Asked Questions
- Conclusion: Getting VICIdial Call Transfer Configuration Right
VICIdial call transfer configuration is one of the most operationally critical settings any contact center administrator will manage. Done right, Vicidial Solution keeps customers moving to the correct department or agent in seconds. Done wrong, it leads to dropped calls, frustrated customers, and agents stuck in a workflow that does not match how your queues actually operate.
This guide provides a precise, deployment-tested walkthrough for configuring both blind and attended transfers in VICIdial, covering agent interface settings, campaign-level permissions, Asterisk dial plan considerations, and real-world routing scenarios.
Whether you are deploying VICIdial for a healthcare scheduling desk, a financial services outbound team, or a real estate lead qualification operation, the transfer mechanics are the same at the platform level. What changes is how you configure them to match your call flow logic. The sections below cover every layer of that configuration.
Understanding VICIdial Transfer Types
Before touching any configuration field, it is important to establish a clear distinction between the two transfer modes VICIdial supports. Confusion between these two at the setup stage is the single most common source of misconfigured transfer behavior in production environments.
| Component | Minimum Specification | Component | Component |
|---|---|---|---|
| Operating System | CentOS Stream 9, Ubuntu 22.04 LTS, or Debian 12 | Operating System | Operating System |
| CPU | 4-core x86_64 (8+ cores recommended for 100+ concurrent calls) | Operating System | Operating System |
A blind transfer moves the caller immediately to the destination number or extension without the transferring agent speaking to the recipient. An attended transfer, sometimes called a warm or consultative transfer, places the caller on hold while the agent dials the destination, speaks with the recipient to verify availability and context, and then bridges the two legs together. Both modes are natively supported in VICIdial and can be enabled or restricted at the campaign level.
How VICIdial Call Transfer Configuration Works at the System Level
VICIdial’s transfer functionality is not a single configuration toggle. It is a combination of three coordinated layers:
- The Agent API layer – governs what actions an active agent session can execute, including initiating a transfer from the agent’s browser interface at /agc/api.php.
- The Asterisk dial plan – defines how the transfer destination extension is routed once VICIdial hands off the channel.
- Campaign and User Group settings – control which transfer options appear for which agents across which campaigns.
When an agent initiates a transfer, VICIdial issues an instruction through the Agent API to Asterisk, which then executes the channel redirect according to your dial plan. A transfer button appearing on the agent screen does not guarantee the transfer will complete successfully if the underlying Asterisk extension is not configured. Both layers must be aligned.
Configuring Blind Transfer in VICIdial
A blind transfer is the faster of the two transfer types and requires less configuration overhead. Here is the step-by-step process for enabling and configuring it correctly.
Step 1 – Enable the Transfer Button in Campaign Settings
Navigate to your VICIdial admin panel. In a standard VICIdial deployment the path is:
http://[YOUR_SERVER_IP]/vicidial/admin.php In a DialerKing custom theme deployment, the admin panel follows the theme structure:
https://demo.dialerking.com/theme-10/dialer/admin.php Copy the following information:
Password: M1a2n3t4r5a6
From the admin dashboard, go to Campaigns → Select Your Campaign → Campaign Detail. Locate the field labelled Transfer-Conf Number and enter the destination extension or number that will receive blind transfers initiated from this campaign.
Step 2 – Configure Transfer Button Visibility
In the same Campaign Detail view, set the Allow Transfers field to ENABLED. This makes the transfer button visible on the agent screen. Setting it to DISABLED removes transfer capability from all agents on this campaign, useful for compliance-sensitive outbound campaigns where transfer activity must be restricted.
Step 3 – Verify the Asterisk Extension
SSH into your VICIdial server and confirm that the extension configured as the Transfer-Conf Number exists in your Asterisk dial plan:
nano /etc/asterisk/extensions.conf A missing or misconfigured extension will cause the blind transfer to fail silently, the agent’s screen clears, but the caller hears dead air or gets dropped.
Step 4 – Test and Verify
Log into the agent interface, take a live test call, and trigger the Transfer button. Confirm the call lands at the configured destination. Monitor the Asterisk logs for channel redirect errors:
tail -f /var/log/asterisk/full | grep REDIRECT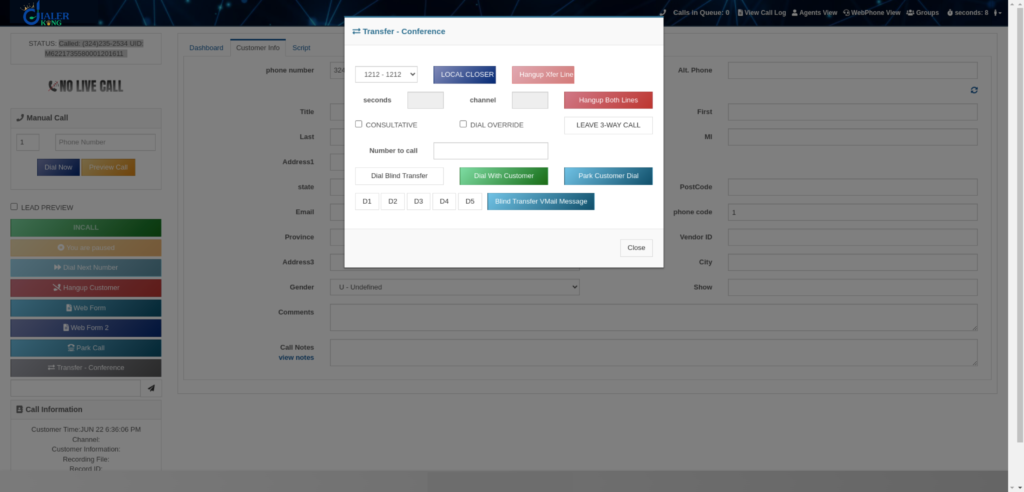
Configuring Attended (Warm) Transfer in VICIdial
Attended transfer configuration requires an additional setup step because the agent must be able to initiate a second outbound call leg while keeping the original caller on hold. This requires the Local Three-Way Calling feature to be active.
Step 1 – Enable Three-Way Calling in Campaign Settings
In Admin → Campaigns → [Your Campaign], find the field Allow 3way Calls and set it to ENABLED. This activates the attended transfer workflow in the agent interface and presents the agent with a three-way call panel including hold, merge, and hangup-one-leg controls.
Step 2 – Configure the Three-Way Call Destination
Set the 3-Way Call Number field to the default destination you want to appear in the attended transfer dial box, typically an internal extension, supervisor queue, or department DID. Agents can override this at transfer time, but a sensible default reduces transfer errors during high-volume periods.
Step 3 – Understanding the Agent Attended Transfer Workflow
Once configured, the attended transfer workflow from the agent’s perspective runs as follows:
- The agent is on an active call with the customer.
- The agent clicks the 3-Way Call button in the agent interface.
- A second call leg is dialled to the configured destination while the customer is placed on hold.
- The agent speaks privately with the recipient, provides context, and confirms readiness to accept the caller.
- The agent clicks Merge to bridge both legs, joining all three parties.
- The agent hangs up their own leg, the caller and recipient remain connected.
- Transfer complete.
This workflow is significantly more reliable than blind transfer for complex escalations, particularly in financial services, where an agent must verbally confirm that a licensed specialist is available before connecting a customer with a sensitive account inquiry.
Setting Up Agent Call Routing and Transfer Groups
For environments with multiple teams, departments, or skill-based routing requirements, VICIdial Transfer Groups define which destination options appear in the agent’s transfer interface, and which agents are permitted to route calls to them.
Creating a Transfer Group
Here you can create named transfer groups that aggregate multiple destination extensions under a single selectable option in the agent’s interface. Each transfer group entry includes:
- Group Name – the label the agent sees in the transfer dropdown.
- Dial Prefix – the prefix prepended to the destination number at transfer time.
- Campaign Association – which campaigns can access this transfer group.
- Active Status – whether the group is currently available for transfers.
Assigning Transfer Groups to Campaigns
Return to Admin → Campaigns → [Campaign Detail] and assign the appropriate transfer groups. Agents logged into this campaign will see only the transfer destinations you have explicitly permitted, an essential access control mechanism for contact centers handling multiple client accounts or product lines simultaneously.
Campaign-Level Transfer Permissions and User Group Control
VICIdial provides a layered permission model allowing administrators to control transfer access at both the campaign level and the user group level. To restrict or grant transfer capabilities by user group:
- Navigate to Admin → User Groups.
- Select the user group associated with the agents you want to configure.
- Locate the Allow Transfers permission and set to Y to enable or N to disable.
- For granular control, combine User Group transfer permissions with the Campaign-level Allow 3way Calls toggle.
Setting User Group transfers to Y while disabling 3-Way Calls at the campaign level gives agents blind transfer only, a common configuration for high-volume outbound campaigns where speed matters more than warm introduction capability.
Accessing and Verifying Configuration via the Admin Panel
For teams using a DialerKing custom VICIdial deployment, the admin panel and agent interface paths differ from the default installation. The agent interface in a standard deployment is:
http://[YOUR_SERVER_IP]/vicidial/vicidial.phpIn a DialerKing custom theme deployment, the path is adjusted per theme:
http://[YOUR_SERVER_IP]/agent/agent.php The admin panel in a DialerKing deployment follows a theme-based path such as:
https://demo.dialerking.com/theme-10/dialer/admin.php Regardless of path, all transfer configuration options – Campaign Detail settings, User Group permissions, Transfer Groups, are fully preserved across custom themes. The theme affects the visual interface, not the underlying VICIdial functionality.
To explore a live configuration environment, DialerKing’s demo portal provides access to multiple custom themes with full admin panel functionality.
Common Transfer Configuration Errors and Resolutions
| Error Symptom | Most Likely Cause | Resolution |
|---|---|---|
| Transfer button absent in agent interface | Allow Transfers DISABLED at campaign level | Set Allow Transfers to ENABLED in Campaign Detail |
| Blind transfer completes but call drops | Asterisk extension missing or misconfigured | Verify extension in extensions.conf; reload Asterisk dial plan |
| 3-Way Call button is greyed out | Allow 3way Calls DISABLED in campaign settings | Enable Allow 3way Calls in Campaign Detail |
| Recipient hears silence after transfer | Audio path issue in Asterisk channel bridging | Check full Asterisk log for bridge errors; verify RTP port ranges |
| Transfer destinations not in agent dropdown | Transfer Group not assigned to current campaign | Assign correct Transfer Group under Campaign Detail |
Frequently Asked Questions
How do I enable the transfer button for agents in VICIdial❓
Transfer button visibility is controlled at the campaign level. Go to Admin → Campaigns → [Your Campaign] → Campaign Detail in the Vicidial admin panel and set Allow Transfers to ENABLED. If the button still does not appear, verify the agent’s User Group also has transfer permissions set to Y under Admin → User Groups.
Can I restrict agents to blind transfer only and block attended transfer in VICIdial❓
Yes. Enable Allow Transfers at the user group level while disabling Allow 3way Calls at the campaign level. This grants agents access to blind transfer only, which is appropriate for high-volume outbound campaigns where attended transfer adds unnecessary overhead or where your operational workflow does not require warm introduction before routing.
What should I check if a VICIdial transfer completes on-screen but the call drops ❓
First, verify that the Asterisk extension configured as the transfer destination exists and is correctly defined in your extensions.conf or equivalent dial plan file. Then check the Asterisk full log for channel redirect or bridge errors: tail -f /var/log/asterisk/full. A missing extension causes the channel to be redirected to an undefined destination, resulting in a silent drop that the agent does not see.
Does VICIdial call transfer configuration differ in custom theme deployments❓
No, the configuration settings are identical across standard and custom theme deployments. What changes is the path to the admin panel and agent interface. DialerKing custom themes preserve all core VICIdial administrative functionality, including all transfer configuration options, while presenting a modernised interface. Changes made in a custom admin panel apply to the same underlying VICIdial database and Asterisk instance.
Conclusion: Getting VICIdial Call Transfer Configuration Right
Effective VICIdial call transfer configuration is a layered discipline. It requires alignment between campaign settings in the admin panel, user group permissions, transfer group definitions, and the Asterisk dial plan handling the actual channel routing. When all four layers are configured correctly, your agents have precise, reliable control over where calls go, and your customers experience seamless, professional routing every time.
The two core principles to carry from this guide: use blind transfer for speed in well-defined routing scenarios, use attended transfer when confirmation and context matter. Manage access through campaign and user group permissions. Always verify the Asterisk layer before diagnosing issues at the admin panel level.
For contact centers deploying on custom VICIdial themes or seeking to modernise the agent transfer experience alongside a platform upgrade, DialerKing’s deployment team provides hands-on configuration support, from initial ViciBox and SVN version assessment through to production go-live.
Ready to configure VICIdial call transfers for your contact center? Contact the DialerKing team, our engineers are available for deployment, configuration, and custom theme development.